Example 6: Add a "Download" Button to the Lightbox
Why?
One of our users asked:
Endi Hariadi @EndiHariadi43 Sep 28 06:40
I want to add a download button to each image. How to do it? I have tried and failed.
How?
Endi is using the Embedded Gallery component, so that is what we will focus on. There are various ways to approach this problem.
- You could dive into the source code of the underlying component, UniteGallery and customize it to your needs. However, this would require quite an effort.
- Or, you could attempt to use the UniteGallery API. However, in our experience, the API is not very mature and in this case not usable (the "item_change" event could work, but unfortunately it isn't triggered when the first image is clicked on and the lightbox first shown, only when the user changes slides).
- You could create your own UniteGallery skin- but again, this would require several hours of research and programming.
- Or you cold just run with a quick-and-dirty jQuery hack
We'll go with #4 :-)
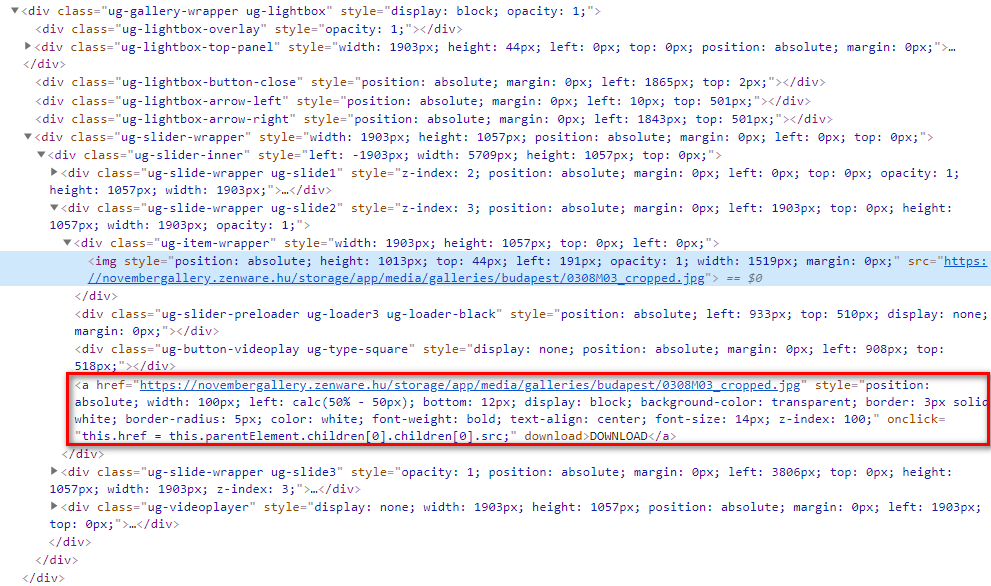
If you inspect the html behind a lightbox in your browser, you can see that the structure is as follows:
div.ug-gallery-wrapper
→ div.ug-slider-wrapper
→ dig.ug-slider-inner
→ div.ug-slide-wrapper ug-slide-1
→ div.ug-item-wrapper
→ img
→ div.ug-slider-preloader
→ div.ug-slide-wrapper ug-slide-2
→ div.ug-slide-wrapper ug-slide-3
The img block is replaced dynamically, and the three ug-slider-wrapper components are manipulated so that it looks like images slide into and out of the user's viewport. We are going to insert a link button inside each div.ug-slider-wrapper element, which will dynamically tell the browser to download the image that is currently being shown. We will make use of the new HTML5 "download" attribute. For some background, read this great tutorial. The generated link will then use javascript to dynamically find the div.ug-item-wrapper element that is before it, and the img element inside of the div.ug-item-wrapper element. So, our link button will look like this:
<a href="https://novembergallery.zenware.hu/storage/app/media/galleries/budapest/0308M03_cropped.jpg"
   style="position: absolute; width: 100px; left: calc(50% - 50px); bottom: 12px; display: block; background-color: transparent; border: 3px solid white; border-radius: 5px; color: white; font-weight: bold; text-align: center; font-size: 14px; z-index: 100;"
   onclick="this.href = this.parentElement.children[0].children[0].src;"
   download="">DOWNLOAD</a>
And it will be inserted into our page as follows:
Get to the point!
So in the end this is all you need to add into your OctoberCMS page to add a download button to each image:
<div class="panel-body">
	{% component 'embeddedGallery' %}
	{% put scripts %}
	<script type="text/javascript">
		$(document).ready(function(){
			$(".ug-slide-wrapper").append('<a href="#" style="position: absolute; width: 100px; left: calc(50% - 50px); bottom: 12px; display: block; background-color: transparent; border: 3px solid white; border-radius: 5px; color: white; font-weight: bold; text-align: center; font-size: 14px; z-index: 100;" onclick="this.href = this.parentElement.children[0].children[0].src;" download>DOWNLOAD</a>');
})
	</script>
	{% endput %}
</div>
and this is how it looks:
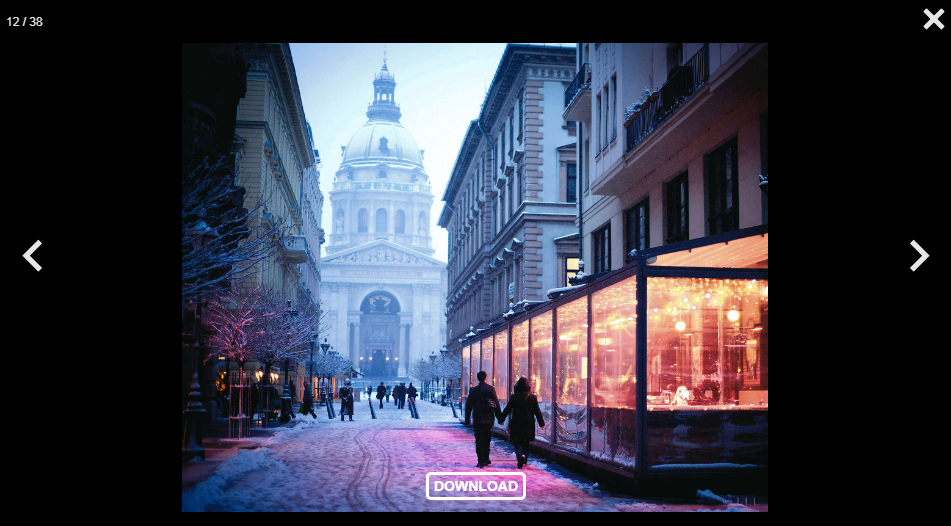
You can check out the first gallery on the November Gallery Demo site for a working example!
Of course this is not the perfect solution to this problem but it works. You can improve upon it by removing the inline-css and perhaps adjust it so that the button doesn't become invisible on a white background. The button only works with browsers that support the download attribute - if you wanted to support older browsers, you could add some checks to the button OnClick handler and handle such cases as well. You could replace the button with an image, or move it to some other part of the page.
Good luck and have fun coding!
No Comments